Visualizzazione post con etichetta BIM. Mostra tutti i post
giovedì, aprile 07, 2016
New Autodesk Blog around BIM and Beyond
Behold everyone, there is a brand new blog around BIM and cool stuff like Dynamo and React Structures that you might want to keep an eye on, so please subscribe and add it to your favorite readings, let's see what's in the box!
Etichette:
Autodesk,
BIM,
Blog,
Dynamo,
React Structures
sabato, marzo 19, 2016
The dream
A while back when I was working for and architectural firm based in Milan Italy I was actively contributing to this blog at a crazy rate, even two posts a day sometimes, and I was answering questions around Revit and BIM in forums, sharing what I know as much as possible.
Knowledge is power, and the simple act of sharing knowledge can make a big difference.
One of my dreams was to be able to start a group of professionals to share ideas, around BIM in Italy and how this is going to change how we see the world and how the world looks on us, as a Country, to aknowledge the value in what we do, because we are passionate about it, because we take proud from being intellectually challenged, pursuing a never ending improvement.
What I felt was missing those days had become a necessity now, and thank to the efforts of Chiara Rizzarda, Claudio Vittori Antisari and Luigi Santapaga, it finally happend.
On March the 15th I was invited to the very first meeting of professionals around BIM in Milan, I saw old and new friends coming from all over Italy there, in a very warm and welcoming atmosphere, each and every one with a different story behind but eager to contribute and grow, together.
We talked about expectations and opportunities, we drew sketches and took notes, I can only speak for myself but I felt really good, I felt free to express my ideas and I was thrilled by the interaction in the room that night.
I was honered to be there, I sincerely hope that these meetings will grow in number of partecipants not only professionals but also owners, managers, contractors, all the people that will have to face the change of approach to their businesses and start a new path on the right foot, being supported by those who get their hands dirty with BIM every day.
Etichette:
BIM,
BUG,
Italy,
Milano,
Underscore,
User Group
venerdì, gennaio 09, 2015
Model freezing
One of the issues that designers are most concerned about is the protection of their intellectual property within a model.
In an environment where the exchange of informations is vital to the process, one can not refuse to cooperate and share his model with other stakeholders involved, plain and simple.
There are different ways to protect the intellectual property without affecting the data exchange, such as using a different file format (e.g. DWF, IFC, etc..) but there's nothing we can do when it comes to native file format for authoring platforms like Revit.
Or maybe not.
I've been looking to the new functionality shown by Jeremy Tammik in his blog, the DirectShape, intended to allow the users to import geometry created in other softwares through other formats like OBJ for instance.
What I was trying to accomplish instead was to create a DirectShape from the actual model, retrieving a solid and fill the voids left by the rooms for 3D printing optimization, I'm still struggling on this particular issue since rooms appear to end up as solids with negative volumes.
Then came to mind a possibile application, the model freezing: one can select a portion of the model that wants to lock and eventually use it as a component. in other projects.
In theory it is possible to freeze the entire model, obtain a generic model, copy and paste it into a blank project, and deliver that to a third party.
The odd thing is that the family created through this process has no Type and it is not even listed in the family browser, so it can't be edited and saved in anyway.
The generic model is not editable and won't even export to CAD for what it matters, the only workaround I found was to export it to IFC.
In this case all of the data is retained except for the 3D geometry and some material information (just the appereance because tagging won't work).
Etichette:
API,
BIM,
BIM Manager,
DirectShape,
Revit
martedì, settembre 02, 2014
LOR - Level Of Reliability
Using acronyms is not really in my culture since I'm not an english mother tongue, it's fairly common though in the rest of the world and I happend to get used to it. I had to be explained what "RAF" stood for in a project based in London, since for me it was Royal Air Force, but the other BIM Manager on the phone told me it was Raised Access Floor, just to name a funny episode that happend to me not too long ago.
Right now the usage of these "magic words" is spreading also in the AEC industry (here's another one).
If everybody understands these acronyms, such as BIM, BEP, VCD and so on, and everybody knows precisely what they refer to there's absolutely no problem with using them.
Unfortunately this is not the case for the subtle LOD (Level of Development), which is sad to note that still too many people tend to confuse with level of detail, which is a completely different concept.
I'd say to shift the attention from the model to the results of the analysis that can be performed on a model at the certain stage of its development.
LOR Level Of Reliability would measure the reliability of those analysis (in a general kind of way), less people would confuse the terminology and the key concepts behind it.
I think at least it is worth a discussion.
Etichette:
BIM,
BIM Manager,
LOD,
LOR
sabato, agosto 23, 2014
Images from the past, hopes for the future
I was looking for some images for a presentation and I came across these pictures of some works I've done at the University prior than 2008, way long before adaptive components came along.
It was definitely fun! but really soon I realized that what I was doing was much, much more than just a 3D model, I saw the potential and what eventually the AEC industry was going to be in the closest future.
That's when I moved my focus from modeling and representation to BIM. Unfortunately most of the people that I know from the University still haven't even approached to BIM and they're just starting now to consider to move, for instance, to Revit because they're blinded by the 3D model and the rendering.
Using Revit to just make a 3d model is like having a Ferrari and use it in the backyard.
So please double check your willingness to learn something new (a BIM approach to design and not just how to use an instrument like Revit), both for productivity on a specific project and in the long run, keep in mind that it can be really painful if you're doing it while you're already working full time but it hasn't necessarely to be a blood bath if you ask for help to competent people.
Break problems into smaller ones, read forums and blogs to find answers to your questions, don't take "no" for an answer and never give up.
Etichette:
BIM,
BIM Manager,
historical buildings,
Revit
giovedì, luglio 31, 2014
Family Management Utils - Linked Family Browser
I'm in New York on vacation these days, and the jet lag is still difficult to manage, so I woke up really really early this morning and I did a few experiments with the code I was working on.
I thought it would be nice to have a family browser for linked files, letting the user choose which family types copy into the control file etc...
With this kind of browser the user can visually see which family belongs to each one of the linked files, it would be great to have a search field to filter the tree (just have no idea how to do it right now, I'm still learning).
Next major step will be implement a tab interface for group of settings and objects such as System families, Other families (I've to find a way to separate annotations from model families as the tendenency is to get rid of annotations in linked files), Materials, Filled patterns, Keynotes, View Filters and View templates... of course I know that most of these features are already there with the transfer project standards but, what I'm trying to do, is to reverse the process: instead of doing the transfer for each one of the linked files, I would like to do the same thing from one control file to all the linked files, just once, extending control over non system families and their parameters.
In addition to that there's the visual control of the contents of the model (walls and floors detailed sections, material swatches, doors and windows assemblies, management of family names and type names accordingly to a user defined sequence of parameters/codes).
There's so much to do to make it work properly though.
With this kind of browser the user can visually see which family belongs to each one of the linked files, it would be great to have a search field to filter the tree (just have no idea how to do it right now, I'm still learning).
Next major step will be implement a tab interface for group of settings and objects such as System families, Other families (I've to find a way to separate annotations from model families as the tendenency is to get rid of annotations in linked files), Materials, Filled patterns, Keynotes, View Filters and View templates... of course I know that most of these features are already there with the transfer project standards but, what I'm trying to do, is to reverse the process: instead of doing the transfer for each one of the linked files, I would like to do the same thing from one control file to all the linked files, just once, extending control over non system families and their parameters.
In addition to that there's the visual control of the contents of the model (walls and floors detailed sections, material swatches, doors and windows assemblies, management of family names and type names accordingly to a user defined sequence of parameters/codes).
There's so much to do to make it work properly though.
So here's a my first attempt, what do you think? please let me know in the comments below.
Etichette:
API,
BIM,
BIM Manager,
family management utils,
Links,
macro,
Revit
venerdì, luglio 25, 2014
Family Management Utils - WIP
This tool I've developed works on door and window families between different files letting the user edit them inside a single control file and pushing the edited families back to the other files. I've collected a few lines of code and put it all together with a very simple interface.
This is the workflow I've imagined:
- Link the different projects into a single control file (CF)
- Acquire the families from the linked files cliking on Copy Types
- Delete duplicate types if necessary
- Create assemblies with 3 main views and dimensions for each type, assigning a unique Type Mark automatically, each assembly is named with this syntax: (TypeMark)_Family_Type
- Edit the components as necessary, fill in the data where needed and then update the linked files with the new version
- You can finally create assemblies in each linked file for documentation purposes, each assembly is created in the first phase and demolished right in the next phase of the phase sequence, so to not interact with the actual project.
During the process the linked files have to be unloaded, keep in mind that also the family type names shouldn't change before the update, otherwise the tool won't be able to perfomr the update as expected.
For the sake of this example I'm using two linked files, a simple one and a workshared one.
In both cases there are the same door and window families and I'm showing the steps of the workflow, when the linked files are loaded the type mark for the family type in common between the CF and the links can't be changed, this is true for any other parameter such as width, height or material finish.
Once in the linked file a purge unused is recomended.
I still haven't figure out how to dismiss automatically the dialog when reloading families and override the parameters. Any suggestion is appreciated.
Etichette:
API,
assemblies,
BIM,
BIM Manager,
Legend,
Links,
macro,
Revit
venerdì, luglio 18, 2014
View Depth Override External Command - Bugs Fixed
You can downlaod a zip file containing the .DLL and the .Addin manifest for the external command.
I've to thank a reader for pointing out some issues with the planting category (because previous version didn't take into account categories with no material quantities just like planting).
Also there was another issue with 2D views because the override was performed on a polar distance like in 3D views, now it's been fixed using the distance between the center of the bounding box of an object and the plane of the view.
I discovered that CGS has copied my first idea, and that was basically the goal of me starting to publish the code: to make companies develop better add-ins, but unfortunately this is not the case.
Now you can choose to pay a subscription to them for this tool (along with many others of course), which by the way doesn't work on perspective views while mine does, so why don't use just mine instead of waisting money? please if you're happy with my code show me some gratitude Paying What You Want via PayPal to:
puntorevit@gmail.com
*UPDATE 2015
The command for Revit 2015 works just fine, there's still need for the .addin to reside in the correct folder and the paths inside the file to be eventually updated.
Anyway the addin file should be copied in here:
C:\ProgramData\Autodesk\Revit\Addins\2015
here's the addin file with paths updated for 2015 version.
Etichette:
API,
BIM,
BIM Manager,
external commands,
Revit,
update,
View Depth Override
giovedì, luglio 17, 2014
Delete Family Type Duplicates Macro
when dealing with a lot of copy and paste of objects among files is fairly common to end up with a project browser overpopulated by family types with equal parameters but a different type name (something like 1200x2400mm and 1200x2400mm 2, quite frustrating isn't it?).
For some category such as Doors and Windows the Type mark parameter is automatically changed to be unique to avoid possible conflicts but all the other parameters remain the same.
Using this macro at your own risk, you can get rid of duplicates in family types.
If you're happy with my code please show me some gratitude Paying What You Want via PayPal to:
puntorevit@gmail.com
Etichette:
API,
BIM,
BIM Manager,
duplicates,
families,
family type,
macro,
Revit
lunedì, luglio 14, 2014
Auto Assembly Macro - WIP
In this video I'm showing the results of a macro I'm working on these days that allows to create an assembly for each door and window type present in the project.
It's still a work in progress though, but what it does is pretty clear:
- create a generic wall sample to host a family instance of the door / window type
- create the family instance
- create an assembly with the family instance, its nested shared families and the hosting wall, whose category is after the family category and the name is a combination of the family name and the family type
- increase the mark type and assign it to the family type
- change the phase of creation and demolition of the assembly to be respectively the first and the second in the sequence
- create three assembly views (plan, elevation and section)
- create two major dimensions in the elevation view (I'm thinking of an early stage door/window schedule for this development)
There are still issues with curtain wall components though, need to fix that.
Using this method it's possible to create a source file that contains all the families and manage them with type marks, materials, and so on very effectively. Then the necessary editing can be extended to other project files really easily with the concept exposed in the previous post. Getting closer.
Etichette:
API,
assemblies,
BIM,
BIM Manager,
coordination,
family type,
macro,
Revit
Family and Type parameters coordination between documents
Working with linked files brings some advantages on the performances of the computer but it introduces also many coordination issues. Even the same firm can use multiple linked files of the same discipline linked together to split the project into more manageable parts. In that scenario when a component family has to be updated in the geometry and/or the type parameters such as the Type Mark, the Description and so on, it's required the user intervention.
Some operations are really easy to do (for example reload a family), let's say it's just time consuming to open the file, reload and save for each one of the linked files where the family is loaded.
Some others such as filling in the type parameters can be tedious and unfortunately can also introduce coordination errors between the files. This means there's a lot of double checking going on and when there's an issue the user has to manually update the values as many times as the number of the linked files or at least the number of the errors catched by his eye during this process. The basic idea of BIM is to insert data in the model only once and possibly in one place in order to avoid this kind of mistakes.
In the example above I'm demonstrating how it is possible through the API to coordinate two different documents, a source (File1) and a destination document (File2) that share a family (for the sake of the examples it's a furniture family called GEN-1).
In File1 the GEN-1 family has just one type (Type 1) with all the parameters filled correctly, while in File2 the same family has a different shape, has three types but their parameters have to updated. There's also another family GEN-2 with a Type 1 just to show that it's not involved in the process even if it is a furniture component and has the same Type name.
Notice that the macro can be run even with no document opened. What I'm gonna do next is to create a private method that updates the family content for specified categories (doors, windows, furniture, and all system families such as walls and floors) for all the files linked in a source project.
It's something close to the idea of the Transfer Project Standards but extended to external families with the ability to override type parameters too.
After the macro has been launched the files are saved, the definition for GEN-1 is the same for both files (rectangular shape) and only Type 1 has been updated to comply with the source file.
This is a little step closer to what I believe to be an ideal tool for Revit project management.
Etichette:
API,
BIM,
BIM Manager,
coordination,
families,
macro,
Revit,
type
mercoledì, luglio 09, 2014
Re-posting: How to deal with Legends in Revit by Mark Twain
I've found this very interesting and useful article by Mark Twain on RevitForum.org blog
I simply report it because it's another step closer to what I believe is a real standard usage of the Revit platform, headed in the same direction of the tools I've been developing lately. There are fair margins for further developments here.
So many thanks to Mark and the Revit community for sharing your knowledge.
How to deal with Legends in Revit
Edited due to remarks made by Forum users. Some pitfalls for the use of Assemblies added in light of honest comparison between the different options.
First of all:
AUTODESK, FIX IT ALREADY!!!! YOU CALL THIS A BIM AUTHORING SOFTWARE? I CAN'T EVEN PROPERLY DOCUMENT THE OBJECTS RESIDING IN MY MODEL, WHETHER IT'S WINDOWS, DOORS OR FREAKIN' TOILET SEATS. THE OOTB LEGEND TOOL IS AN ABSOLUTE TOTAL HEAP OF UTTERLY USELESS CRAP!
And breathe...
But seriously: It's an insult to all of us working on real projects needing to do real documentation. I have been on Revit since version 5.1 and it has been useless as long as I can remember (don't even know if there were Legends on that version, but if there were: they sucked back then too).
Why are legends bad?
1. You can only have a few different views: plan view, front and back elevation. How about sections? How about 3D views?
2. No tagging, no way to extract data from the elements (THAT is the freaking purpose!!!)
3. NO connection to the elements actually used in the model. If an element is deleted, it will remain in the Legend. No way of counting elements.
See image 1.
So: useless crap it is... The question is: what should it be like then? There are a few options, listed in order of usability:
1. Phases
The easiest to set up, but also the hardest to manage and check for model compliance.
O, I added my sample files to this thread on Revitforum.org.
Happy Reviting,
Mark Twain
I simply report it because it's another step closer to what I believe is a real standard usage of the Revit platform, headed in the same direction of the tools I've been developing lately. There are fair margins for further developments here.
So many thanks to Mark and the Revit community for sharing your knowledge.
How to deal with Legends in Revit
Edited due to remarks made by Forum users. Some pitfalls for the use of Assemblies added in light of honest comparison between the different options.
First of all:
AUTODESK, FIX IT ALREADY!!!! YOU CALL THIS A BIM AUTHORING SOFTWARE? I CAN'T EVEN PROPERLY DOCUMENT THE OBJECTS RESIDING IN MY MODEL, WHETHER IT'S WINDOWS, DOORS OR FREAKIN' TOILET SEATS. THE OOTB LEGEND TOOL IS AN ABSOLUTE TOTAL HEAP OF UTTERLY USELESS CRAP!
And breathe...
But seriously: It's an insult to all of us working on real projects needing to do real documentation. I have been on Revit since version 5.1 and it has been useless as long as I can remember (don't even know if there were Legends on that version, but if there were: they sucked back then too).
Why are legends bad?
1. You can only have a few different views: plan view, front and back elevation. How about sections? How about 3D views?
2. No tagging, no way to extract data from the elements (THAT is the freaking purpose!!!)
3. NO connection to the elements actually used in the model. If an element is deleted, it will remain in the Legend. No way of counting elements.
See image 1.
Image1: Useless crap
So: useless crap it is... The question is: what should it be like then? There are a few options, listed in order of usability:
1. Phases
The easiest to set up, but also the hardest to manage and check for model compliance.
Image2: Adding Legend Phases
Image3: Creating Legend Views and setting component Phases
Image4: Creating a coordination schedule
- Create two extra Phases: Legend and Demo Legend. Place them before the regular Phases, see image 2.
- Duplicate a Plan View, set Phase to Legend and place your Legend components. Select all Legend components and set the options to Demolish in phase Demo Legend, see image 3.
- Create all Legend views you want and Tag away happily.
- Create a Door schedule with 3 columns: Family and Type and Count. In the Properties screen, Sorting tab, sort by Family and Type. Check off "Itemize every instance". You now have a overview of all types in the model. Now duplicate that schedule and set the Phase to "Legend". You can now compare both schedules side by side to see if all elements are accounted for see image 4.
Pro's:
- Total control over Legend views, tagging, and so on.
- No influence over the model, no need to hide things in regular model views
- It's possible to create schedules to check whether all types are accounted for in the schedule.
Con's:
- Lot of work to set up views.
- No way of distinguishing different instances, there's only a limited amount of parameters that can be used to sort the schedule.
- Needs working knowledge of Phasing
- Needs two schedules and the ability to check them side by side. This could get difficult in large models with lots of types.
- Needs extra "space" in the model to place the Legend components.
- Not very suited for Legend views of multiple components (for instance a room layout, windows with ornaments, window sills and such).
2. Design options
Image5: Adding Design Options
Image6: Adding elements to a Design Option
Image7: Setting up coordination schedule
Image8: Coordination schedule
A bit harder to set up, but has better ways of checking for Legend-Model consistency:
- Set a Design Option Set called "Legend". Add 2 Options: "Model" and "Legend". See image 5.
- Duplicate a Plan View and place all elements you want to create Legends view from, somewhere outside the model's extents. Due to the setup of the Design Options, they will not be visible in the "normal" model views. See image 6.
- Create all Legend views you want and Tag away happily.
- Create a Door schedule with 3 columns: Family and Type, Mark (or any other text instance parameter) and Count. In the Properties screen, Sorting tab, sort by Family and Type and then by Mark. Check off "Itemize every instance". You now have a overview of all types in the model, see image 7.
- Go to the Legend door, select it, fill out the Mark value as shown in image 8. All the "normal" doors have a blank value.
Image 7 shows us that there is one type in the model that does NOT have a Legend component... This is a fast and reliable way to check whether all TYPES have Legend components. It does not help with instance based deviations...
Pro's:
- Total control over Legend views, tagging, and so on.
- No influence over the model, no need to hide things in regular model views
- It's possible to create schedules to check whether all types are accounted for in the schedule.
Con's:
- Lot of work to set up views.
- No way of distinguishing different instances, there's only a limited amount of parameters that can be used to sort the schedule.
- Needs working knowledge of Design Options
- Needs extra "space" in the model to place the Legend components.
- Not very suited for Legend views of multiple components (for instance a room layout, windows with ornaments, window sills and such).
3. Assemblies
My new favourite, and very close to what the Legend feature should be:
Image9: Creating an Assembly
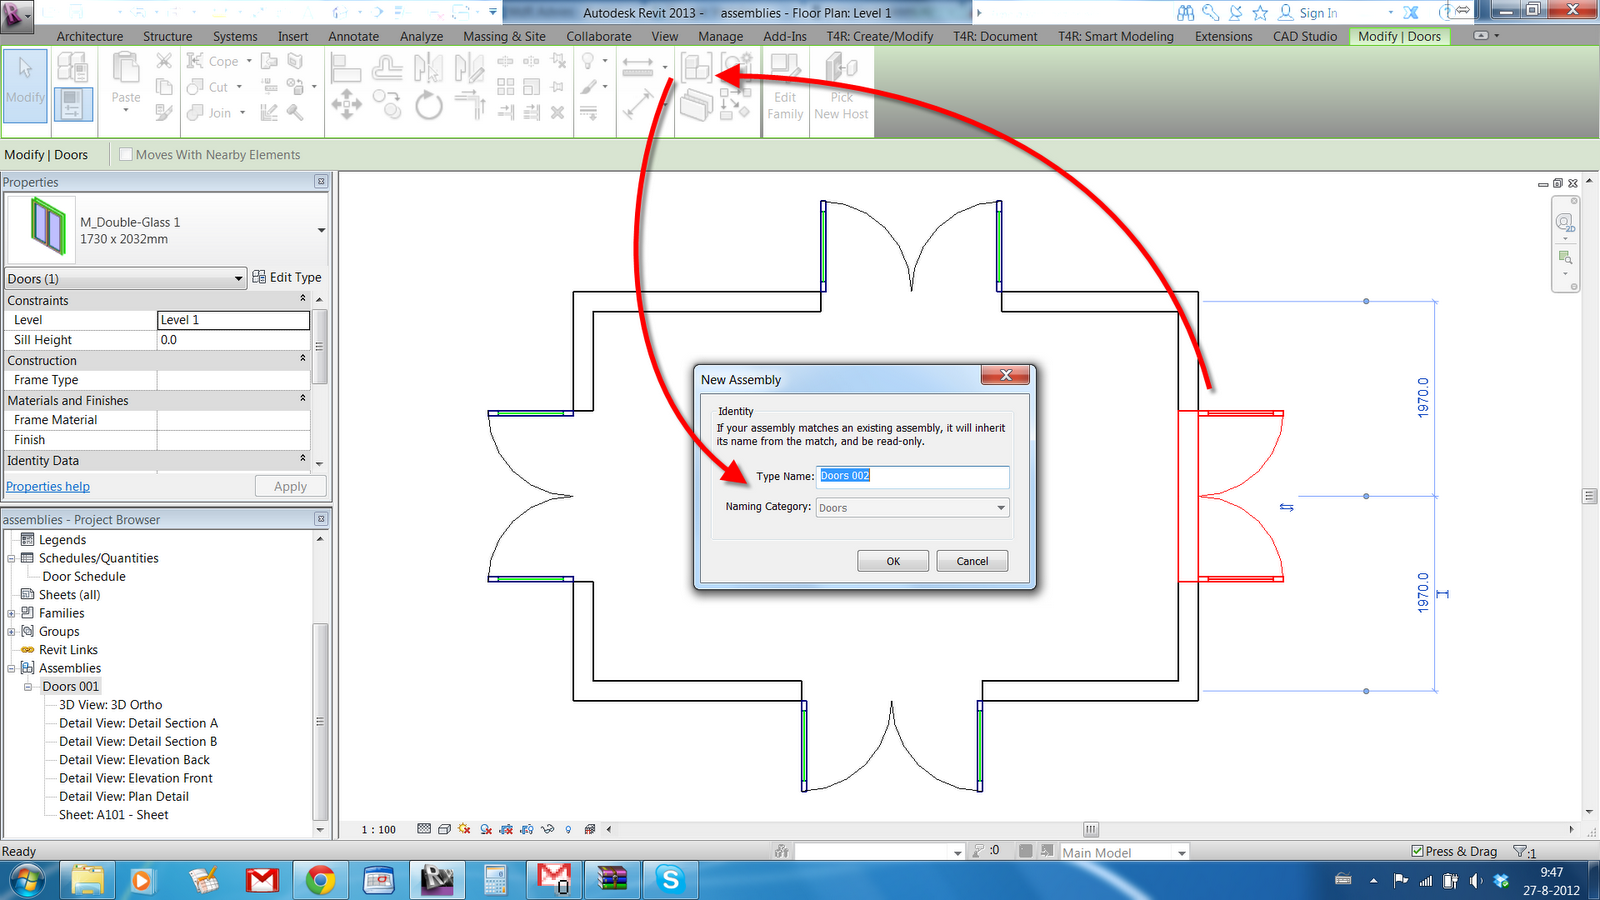
- Place your components in the Model. Select a component and choose "Create Assembly" from the contextual tab. Choose an appropriate naming strategy (I use the family + typename which can expand dramatically when you're creating Assemblies from multiple elements), see image 9.
Image10: Selecting Assembly Views
- Select the Assembly and choose "Create Views" from the contextual tab. Select which views you want, and if they should be placed on a sheet, see image 10. Tag away happily.
- Select next item, repeat the steps above. IF your element matches an existing assembly, it will turn into the same one, see image 11. Best part: this is on instance level! So if you have different instance parameters, it will be a new Assembly. Only problem: when using a unique Mark value to differentiate between different elements of the same kind.
Image11: Duplicate Assemblies are recognised
- You can tag the Assembly in the model to refer to these Assembly views. Which solves the Mark problem...
- Create a Door schedule as shown in option 1 and 2. Add an extra field "Assembly Name" to check whether all components have been added to an Assembly.
Pro's:
- Legend Views with the click of a mouse button.
- Total control over Legend views, tagging, and so on. Crop Regions can be rotated to meet specific needs
- No influence over the model, no need to hide things in regular model views
- Simply add a column to your object schedules to check whether all types are accounted for in the schedule.
- Recognizes differences on an Instance Level.
- No extra "space" needed in the model to place Legend components
- Suited for Legend Views of multiple components.
- Easy to use workflow.
- (Shared) parameters can be added to assemblies to allow tagging and scheduling.
Con's:
- Instance parameter awareness can be a problem, however this is manageable by adding those parameters to the Assembly itself.
- There's no way to port parameter values from the objects inside an Assembly to the Assembly itself without using the API.
- It would be nice to be able to create Embedded Schedules for Assemblies to have both the Assembly AND the underlying objects in one schedule.
- Most annoying one: you need to manually place all elements in an Assembly one by one. No way to batch-create an Assembly. No way to properly place an Assembly when it's (wall) hosted (try placing an Assembly door...)
- MAJOR BIGGIE: Assemblies do NOT update when changes are applied to instance parameters. WTF??? It recognises differences in instance parameters upon creation, but not when changing them? I thought Revit ALWAYS updated modelled stuff? What the hell kind of cad solution is this?
- Adding objects to an Assembly (for instance, adding a windowsill to a window) creates a new Assembly type. Which is in some ways logical, but also a shame. Verdict on this one is still out...
- Groups cannot be Assembled (is that the correct term?). I get this, I think, because Groups are in many ways similar to Assemblies. I can imagine that these two might collide, but it's not perfect.
Summary
Legends suck. They suck for text notes, they suck for diagrams, and they suck big time for building components. The first two options described here are at best mediocre workarounds with lots of pitfalls and tons of extra work.
Then there were Assemblies... And all was better.
Provided Autodesk fixes a few minor bugs, it is the documenting feature we have been waiting for, for a LONG LONG time.
As far as I'm concerned, Autodesk can delete the Legend tool all together. I will be sticking with Assemblies for Building components from now on (and Generic Annotations for anything else).
HOWEVER: when you're on big projects with lots and lots of types, this solution might not work for you. Because whenever an INSTANCE parameter changes, you'll need to update all Assembly instances in the project. Which sucks big time. It's doable on smaller projects, and it works well when you're changing type parameters. But not when changing INSTANCE parameters. And that is a shortcoming well worth noting. (off course, you could do a "select all instances" > change, but it's the principal of things)
O, I added my sample files to this thread on Revitforum.org.
Happy Reviting,
Mark Twain
Etichette:
BIM,
BIM Manager,
design options,
Legend,
phases,
Revit,
revitforum,
standard
martedì, luglio 08, 2014
Material Swatch Macro
This macro goes in the same direction of the previous with the goal of a better management of the projects through the usage of tools that allow the users to save time and visualize better the content of the project.
Generic model families will be generated for each material in the project and their material instance parameter will change automatically.
Here you can find the code and a file to use with the generic model and the tag used in the example above.
If you're happy with my code, please show me some gratitude Paying What You Want via PayPal to:
puntorevit@gmail.com
lunedì, luglio 07, 2014
Category "Other": any ideas?
Sometimes when you deal with worksets you can find some unexplicable objects popultating Workset1 (one of the default worksets created by Revit when the work sharing has been activated).
I wrote a little macro to retrieve in one line all the IDs of the objects grouped by Workset, divided by Instances and Type definitions.
Here's an excerpt of the txt file that you will find on the desktop (I've used notepad++ to show how the rows are built).
Anyway, I can't figure out what this "Other" category stands for, any ideas? There are no good views to show those elements in the working canvas.
You can find the code here.
If you are happy with my code please show me some gratitude Paying What You Want via PayPal to:
puntorevit@gmail.com
mercoledì, luglio 02, 2014
Hatch to Room 2 - Update
This version of the code takes into account also overlapping arcs, so no more warnings of overlapping objects should pop up when you run the macro (like in previous versions).
To determine if two arcs are overlapping I used the Project() method which projects a XYZ point onto a curve and then I measured the distance between the projected point and the original point (which is one end of the other curve). If the distance is equal to zero (well, a rounded distance at the nineth decimal digit because you never know...), then the curves overlap.
I managed to reverse one of the two arcs to get the proper result which is the shortest arc passing through all the vertices of the two orginal arcs, because the algorythm works if the curves are equally oriented (in other words they share the same normal).
You can find the source here. If you are happy with my code please show me some gratitude Paying What You Want via PayPal to:
puntorevit@gmail.com
Etichette:
API,
arcs,
BIM,
BIM Manager,
hatch to room,
lines,
macro,
update
giovedì, giugno 26, 2014
Auto Wall Schedule WIP - Code Sharing
For those of you who are interested in the code of the macro, you can find it here.
If you need a blank rvt file with all the tags I've used to run a "test drive" use this one.
For any questions, please leave a comment below or contact me via email. if you are happy with my code you can show me some gratitude and PayWhatYouWant via PayPal at:
puntorevit@gmail.com
martedì, giugno 24, 2014
Auto Wall Schedule - Views on Sheet
At this point I'm able to place the views created with the macro on a sheet accordingly to the type mark of each sample.
There is yet a lot to do to handle all the exceptions though. I'm concerned about the customization needed for each project when the title block has to change.
The material schedule on the right pane can be placed automatically and the family type of the main wall tag can be picked using the function parameter of the wall but still, it needs to be checked by the user.
As you can see from the video some material tag is filled with the correct value but the majority of them don't, I couldn't figure out why this is happening.
Any suggestion is really appreciated.
The floor macro is ready too as it has a very similar behavior to the wall one.
lunedì, giugno 23, 2014
Auto Wall Schedule Macro - Work in progress
I've been developing a macro during the past week to automate some tedious tasks such as the wall types / floor types documentation.
I'm sharing a work in progress of the macro that shows how it works:
- for each type in the project creates a sample and gives a type mark
- creates a section view across the width of the sample
- places a number of tags in the view (category tags, material tags)
- creates parts and dimensions for each layer and for the overall width of the sample
There are a few things that I would like to address: material tags don't update correctly, there's still need for the user intervention even if it takes just a couple of nudges up and down, it shouldn't be necessary though; I wish I could use keynote material tags but it seems to be impossible to create Keynotes via API, somehow I've found a way to copy the Keynote values in the project to the material mark but there's need to select a keynote tag (it could be any user keynote, even with a random value) to trigger the process, so it's not a solution even if it gets the job done because it won't update automatically.
In addition to these tasks I'm thinking of placing the views automatically on sheets.
An interesting thing I learned this time is about a property of the geometry options, in fact I was struggling to obtain the references of the planar faces of the parts retrieved from the samples as solids.
If ComputeReferences is set to true in the geometry options it's possible to retrieve a valid reference that can be added to the ReferenceArray to be used to create dimensions.
Updates to follow, auto floor schedule too.
If anyone is interested in seeing the code as it is right now, please contact me at puntorevit@gmail.com
martedì, giugno 03, 2014
Auto Floor Maker 2 External Command - 2015 update
Here's the update for Revit 2015 of this add-in I wrote to create finish floors and thresholds starting from a selection of rooms and doors.
Here's the zipped file containing the .dll and the .addin manifest, they have to be copied to this path:
C:\ProgramData\Autodesk\Revit\Addins\2015
If you're happy with my code, please Pay What You Want via PayPal to:
puntorevit@gmail.com
Etichette:
2015,
auto floor maker,
BIM,
BIM Manager,
door threshold,
Revit,
Revit add ons,
Rooms
mercoledì, ottobre 23, 2013
AEC You and Me
Blog interesessantissimo di Julien Benoit, che ho avuto il piacere di conoscere al Revit Technology Conference di Delft.
Una persona squisita, intelligente e appassionata del proprio lavoro come si può facilmente capire dai primi post che sta pubblicando in questi giorni.
Julien è uno dei moderatori di Revitforum.org, collaboratora per uno dei maggiori general contractor in Francia, Bouygues Construction.
Sta cominciando a condividere i progressi che sta facendo nell'esplorazione delle potenzialità di Dynamo nel lavoro di tutti i giorni.
Da seguire.
Etichette:
BIM,
BIM Manager,
Blog,
Dynamo,
Revit,
Revit Technology Conference 2013
Iscriviti a:
Post (Atom)